Wellcraft, V20 and Steplift remain the property of the Wellcraft Company
Install the app
How to install the app on iOS
Follow along with the video below to see how to install our site as a web app on your home screen.
Note: This feature may not be available in some browsers.
You are using an out of date browser. It may not display this or other websites correctly.
You should upgrade or use an alternative browser.
You should upgrade or use an alternative browser.
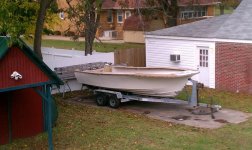
Va Beach v20 project
- Thread starter Kracker Jack
- Start date
Kracker Jack
God
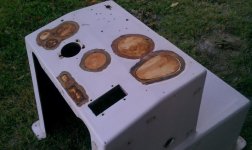
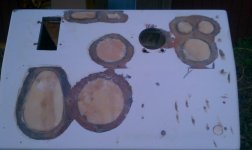
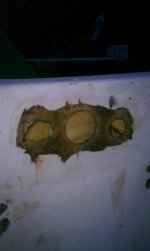
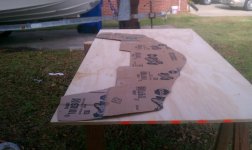
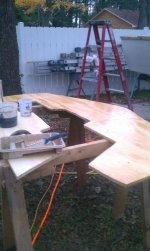
repairing some holes in the console cut my ply to fit then glued the in with a resin woodflour mix. They tightened up solid as a rock.
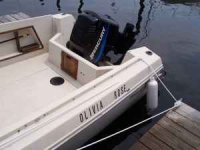
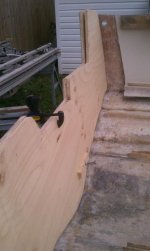
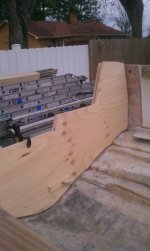
Here is the transom configuration im gonna go with. I realize you all want me to put a 25" transom on this boat, I just can't afford to buy a new 25" inch motor when i have 2 perfectly running 135hp's. So to get the best of both worlds I'm gonna set my transom up like this with a 20" inch transom and then glass in a sump well with a wall kinda like this. Any opinions?
Here is the transom configuration im gonna go with. I realize you all want me to put a 25" transom on this boat, I just can't afford to buy a new 25" inch motor when i have 2 perfectly running 135hp's. So to get the best of both worlds I'm gonna set my transom up like this with a 20" inch transom and then glass in a sump well with a wall kinda like this. Any opinions?
Attachments
Last edited:
Destroyer
God
repairing some holes in the console cut my ply to fit then glued the in with a resin woodflour mix. They tightened up solid as a rock.
Here is the transom configuration im gonna go with. I realize you all want me to put a 25" transom on this boat, I just can't afford to buy a new 25" inch motor when i have 2 perfectly running 135hp's. So to get the best of both worlds I'm gonna set my transom up like this with a 20" inch transom and then glass in a sump well with a wall kinda like this. Any opinions?
No opinion on the transom..(I just don't know enough to make an intelligent comment).. But that's a really nice repair job on the console!!!

Kracker Jack
God
RidgeRunner
God
Long winded apology in advance.
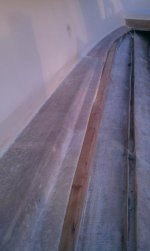
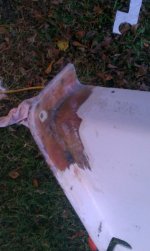
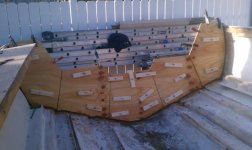
Grinding job looks Fantastic.. Console looks good too. Stringers have to go in before the sole. Advice takes all forms.. You got a lot of glassing to do. Transom, Stringers then sole. I like the idea of a nice splashwell on 20" transoms. The factory thought so too. Your V should sit high in the water with the 135 so no big deal.
Layup schedule for the transom. You have the plywood if I remember correctly. Make a pattern out of cardboard or whatever, cut the plywood out and dry fit. Rough up the plywood then laminate the plywood together to get the thickness desired using 2 layers of CSM in between pieces and weight down until dry. Trim the edges and then putty or glass the plywood in place. I found a fiberglass shop that allowed me use of their transom clamps. Another way to hold it together is to clamp where you can and drill through the outside of the transom and use screws to pull the core tight against the outer skin where normal clamps won't reach. Remove and fill the screw holes after dry. There will also be the original mounting holes for the motor. You can find some long bolts, fit the core exactly where it needs to be, drill the bolt holes in the core using the factory holes as a pattern and then use a piece of scrap 1x4 or 2x4 on the inside to squeeze the core against the outer skin. You may end up with a combination of all of the above and/or more. If you use putty try and wipe up excess and/or use putty to fillet the edges and transitions. Once the transom kicks and you remove the clamps you can grind the edges reinforce the perimeter (sides and bottom) with one layer of medium weight 8" or 10" wide tape and one layer of 1708, wet on wet and allow the 1708 to overlap the sides by 6-8". Heavier layups are OK but I would try to incorporate some transom knees when I was making up the stringers. Wherever the stringers touch the transom and inside hull bottom in the back will need to be lightly ground again to facilitate glassing but only at those attachment points and 12" on either side.
The sole and stringers: Need to figure from the topside down to get the correct stringer/sole height. Run some string from the freshly ground floor port to stbd. then make the stringers short of that by the thickness of the core you are using in the floor and don't forget to reduce the height of the stringers by the anticipated thickness of the glass on top of the stringers and bottom of floor if you plan to glass that too. ie, floor core thickness 3/4" + glass on top of stringers 1/8" + glass on floor bottom 1/16" + fudge factor of 1/16" to 1/8" = Stringer height 1 1/16" below your strings from stem to stern. Easier to build up a stringer than to take one down so the fudge factor. Wellcraft attached my liner to the top of the stringers with fiberglass putty. If you go the same route the sole should lay real close to flush with the top of your floor so you can glass the top of your floor and your sole to your existing side pieces in one visit. Where is Skool and the glassmen. I want another opinion. LOL.
Grinding job looks Fantastic.. Console looks good too. Stringers have to go in before the sole.
Advice takes all forms.. You got a lot of glassing to do. Transom, Stringers then sole. I like the idea of a nice splashwell on 20" transoms. The factory thought so too. Your V should sit high in the water with the 135 so no big deal. Layup schedule for the transom. You have the plywood if I remember correctly. Make a pattern out of cardboard or whatever, cut the plywood out and dry fit. Rough up the plywood then laminate the plywood together to get the thickness desired using 2 layers of CSM in between pieces and weight down until dry. Trim the edges and then putty or glass the plywood in place. I found a fiberglass shop that allowed me use of their transom clamps. Another way to hold it together is to clamp where you can and drill through the outside of the transom and use screws to pull the core tight against the outer skin where normal clamps won't reach. Remove and fill the screw holes after dry. There will also be the original mounting holes for the motor. You can find some long bolts, fit the core exactly where it needs to be, drill the bolt holes in the core using the factory holes as a pattern and then use a piece of scrap 1x4 or 2x4 on the inside to squeeze the core against the outer skin. You may end up with a combination of all of the above and/or more. If you use putty try and wipe up excess and/or use putty to fillet the edges and transitions. Once the transom kicks and you remove the clamps you can grind the edges reinforce the perimeter (sides and bottom) with one layer of medium weight 8" or 10" wide tape and one layer of 1708, wet on wet and allow the 1708 to overlap the sides by 6-8". Heavier layups are OK but I would try to incorporate some transom knees when I was making up the stringers. Wherever the stringers touch the transom and inside hull bottom in the back will need to be lightly ground again to facilitate glassing but only at those attachment points and 12" on either side.
The sole and stringers: Need to figure from the topside down to get the correct stringer/sole height. Run some string from the freshly ground floor port to stbd. then make the stringers short of that by the thickness of the core you are using in the floor and don't forget to reduce the height of the stringers by the anticipated thickness of the glass on top of the stringers and bottom of floor if you plan to glass that too. ie, floor core thickness 3/4" + glass on top of stringers 1/8" + glass on floor bottom 1/16" + fudge factor of 1/16" to 1/8" = Stringer height 1 1/16" below your strings from stem to stern. Easier to build up a stringer than to take one down so the fudge factor. Wellcraft attached my liner to the top of the stringers with fiberglass putty. If you go the same route the sole should lay real close to flush with the top of your floor so you can glass the top of your floor and your sole to your existing side pieces in one visit. Where is Skool and the glassmen. I want another opinion. LOL.
Kracker Jack
God
Out of all the glass guys on here I was expecting SKooLS to respond! Lol! He seems like he is.very knowledgible on this subject. My knee boards are gonna be incoporated on my strigers at the transom to also incorporate my motor well . I'm also gonna use one of my large fish boxes that I salvaged out of my existing floor to make a new sump well at the transom. Ridge thanks for all the help I'm comfortable applying the material but I'm just not sure what material is best suitable at some stages. Once again thanks to everyone for the help.
Kracker Jack
God
well today is the day that I install and glass my new transom!!!!!! Im sitting here drinking some coffe waiting for the temp to come up, Its suppose to be 65 here in va beach today. I will take plenty of pictures and document all stages. im gonna be using the allthread method drilling holes through the outer skin and through the core and tighten them down to clamp core and glue them together at once. and a thickened resin between core layer and outer skin and core with a 1/4 inch knotch trowel to distribute thickened resin on the surfaces. Wish me luck fellas!!!!
Destroyer
God
well today is the day that I install and glass my new transom!!!!!! Im sitting here drinking some coffe waiting for the temp to come up, Its suppose to be 65 here in va beach today. I will take plenty of pictures and document all stages. im gonna be using the allthread method drilling holes through the outer skin and through the core and tighten them down to clamp core and glue them together at once. and a thickened resin between core layer and outer skin and core with a 1/4 inch knotch trowel to distribute thickened resin on the surfaces. Wish me luck fellas!!!!
Sometimes we make our own luck. Sounds to my like you have this one covered already without any luck involved. Just take your time and you'll be fine. Remember to have your wife take pics of you and the transom. That way you don't get resin on the camera.

Kracker Jack
God
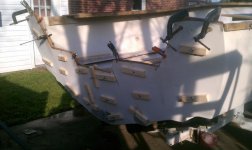
everything went awesome today!!!! I am an amatuer at this and if i have any word of advice to someone who is replacing the transom or the sole in a boat is to build the project in your head over and over before you start!!! make sure all needed materials are close and ready at hand. It makes everything go so much easier. My transom core install today went perfect. Pictures will be up soon.
Kracker Jack
God
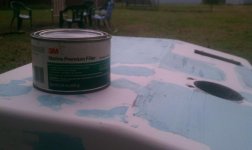
I did some other stuff today. After glueing and plugging my holes for my console I laid a single layer of 1.5 CSM over the plugs and then faired with 3M premium. I also rebuilt a corner of my console that was cracked.
Attachments
Kracker Jack
God
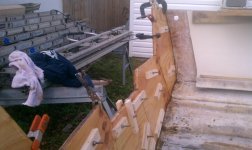
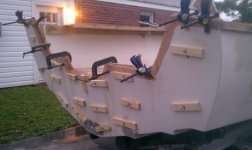
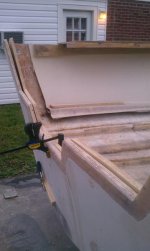
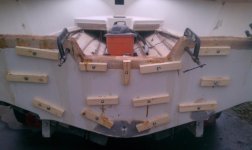
Well I clamped her in every spot I could!!!!! I only did one layer of ply because I wanted to do it one layer at a time and did'nt want my my work to get ahead of me. Im going to soak dowl rod with resin and then run the dowls rods through my clamping holes when the laminating is complete. I cut relief cuts in my plywood in 4 spots to allow the ply to conform to the outer skin I then filled the relief cut with thickened resin. I am very happy with the way the first piece turned out. Im going to clean out one of the garage bays at my dads friday so i can pull the boat in there saturday ITS GONNA GET COLD!!!!!
Attachments
reelapeelin
God
Kracker...could you use an apprentice??...you're doin' the kind of stuff I'd like to learn...wish you were closer...looks fun!!...nice work...
Kracker Jack
God
good work i need to do the same thing excect on an inboard and the floor from 1foot in front of the motor cover back this post helped alot[/
Mike where in Chesapeake do you live? Have you started your repair yet?
Kracker Jack
God
REEL Im just as new at this as anybody. I have done alot of research. And of course I fell upon this really awesome website called WELLCRAFTV20.COM!!!!!!!!!!!! that has helped out ALOT!!!! I would'nt have the motivation if it were'nt for this site and all you V lovers on here.
Kracker Jack
God
Kracker Jack
God
smokeonthewater
God
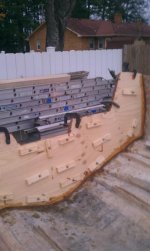
yeah but what are you gonna do if you ever need a ladder for something?
LOL.... looking good
LOL.... looking good
Kracker Jack
God
OHHH Im not lacking in the walkboard and ladder department!!! lol!!!
RidgeRunner
God
Nice work. Lots of quality grinding to get where you are now. I really like the way your planning on glassing the top of the transom. Clean too. First time? You are a natural.