Wellcraft, V20 and Steplift remain the property of the Wellcraft Company
Install the app
How to install the app on iOS
Follow along with the video below to see how to install our site as a web app on your home screen.
Note: This feature may not be available in some browsers.
You are using an out of date browser. It may not display this or other websites correctly.
You should upgrade or use an alternative browser.
You should upgrade or use an alternative browser.
Va Beach v20 project
- Thread starter Kracker Jack
- Start date
Kracker Jack
God
Kracker Jack
God
Kracker Jack
God
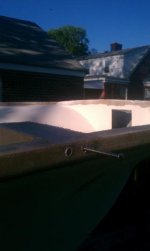
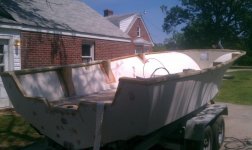
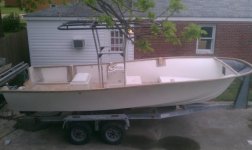
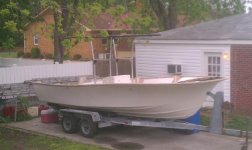
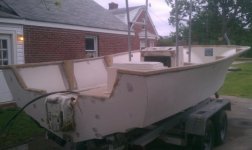
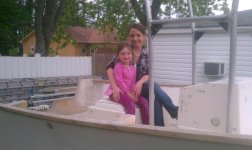
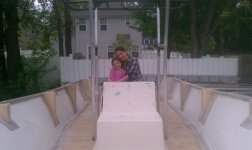
Here's some pics of the boat getting the floor plan fine tuned so I can take some measurements and references to cut holes in my floor for my utility/acess hatches. And also a couple pictures of my 2 beautiful ladies!!!!!
Attachments
Kracker Jack
God
Coming right along, I'm looking forward to your paint job. Quitaround with lights and get to sprayin!
I kid, my neighbors must think I have a screw loose for the amount of time I just stare at my boat thinking of the goodies I want to put on her.
Funny you say the word PAINT! I just ordered a my Interlux epoxy primer. I still have alot of construction and glassing to do on the cap and alot of fairing to do on the whole boat. Im hoping to be priming in the next 4 weeks. and yes my neighbors think im crazy also!! I took that one picture off the roof of my shed and my 81 year old neighbor came out and said qoute on qoute " your eat up with that boat arent ya son" and I just laughed.

tartuffe
Junior Member
Same boat, no pun intended. I just got my new fuel tank in so that cleaned my bank out for another couple weeks. I'm not ready for it just yet but it was such a great deal I jumped. I want to buy all my paint at the same time and that Interlux primer is giving me heartburn.
Did you go with the 2 gallon kit? I'm just doing the entire hull, no deck or gunnels. I would hate to get a gallon and have to wait on more.
Did you go with the 2 gallon kit? I'm just doing the entire hull, no deck or gunnels. I would hate to get a gallon and have to wait on more.
Kracker Jack
God
I bought a gallon kit. Im just priming the sides of outer hull and the sides of inner liner and cap. The floor and cap will be done in durabak (UV rated bedliner 'white') and the bottom will be done with Interlux VC performance epoxy so no primer is needed.
RWilson2526
God
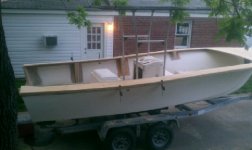
Been a while since i checked in....really starting to look like a finished product now. Assuming thats the family in those recent pics I think they deserve an award for giving you what must be a whole lot of uninterupted work time!!!
Kracker Jack
God
Been a while since i checked in....really starting to look like a finished product now. Assuming thats the family in those recent pics I think they deserve an award for giving you what must be a whole lot of uninterupted work time!!!
Yea RW those are my girls!!!! They have been very patience with me. But I also include them on the build also. Laila my 5 year old is so excited she is a fishing fool! Irene was born and raised on chincoteague island up on the eastern shore of Virginia so she is a boat girl and has actually enjoyed watching the progress, she also pick out the color of the boat.
Kracker Jack
God

reelapeelin
God
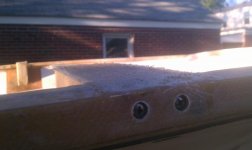
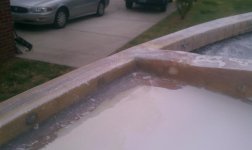
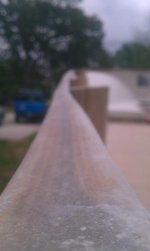
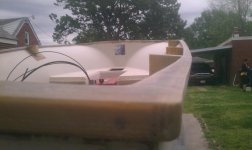
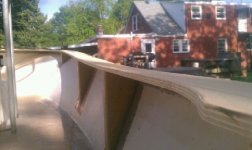
The wide gunwale tops really DO IT!!...I like the old CCs, but yours looks much cleaner and at least appears to have lost some weight...I mocked the cap up today. Boat looks awesome with the gunwale supports and the cap on. Really has that custom look to it.

jasoncooperpcola
God
Looking good Kracker! I love the looks of the wide gunnel caps.
Kracker Jack
God
I FINALLY FOUND MY POWER TRIM AND TILT BRACKET!!!!! For only 50 dollars. this was the last item need to put this huge puzzle together.
For only 50 dollars. this was the last item need to put this huge puzzle together.Destroyer
God
I FINALLY FOUND MY POWER TRIM AND TILT BRACKET!!!!!
Whoot....grats!!!!
RidgeRunner
God
Looking great.
Kracker Jack
God
Love the cap man... She's gonna be SWEET!
Bradford, yea shes a v20 but a little different!! I cant wait to put her in the water.
Kracker Jack
God
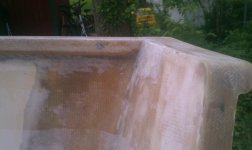
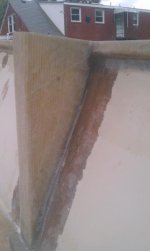
I sanded my cap pieces down today and hot coated and glassed the bottom side. I figured if I glassed most of bottom now it would save me a back ache glassing it in the boat. The next plan of attack is to rough in the returns (Carling,Coaming) on the inboard side of cap, I plan on putting coaming pads all the way around the boat so how low should i make my returns? 4"? 3 1/2"? whats the measurement on the factory returns? or in boat building terms the carling. or some call it the coaming.