Transom replacement

71mako19

Member
Started the transom replacement, pictures speak for themselves:

IMG_2419.jpg


IMG_2420.jpg


IMG_2421.jpg


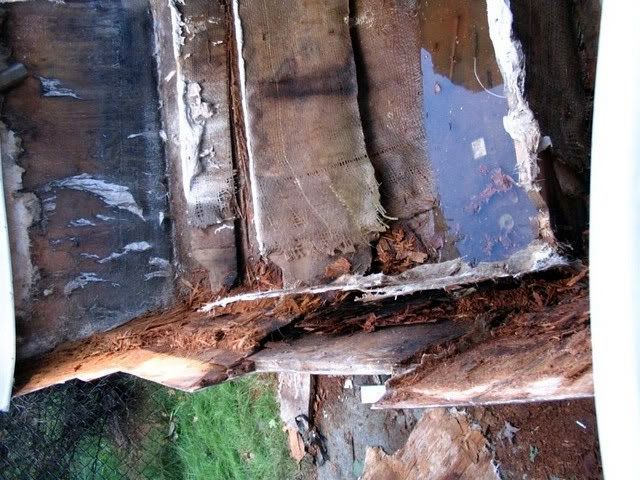
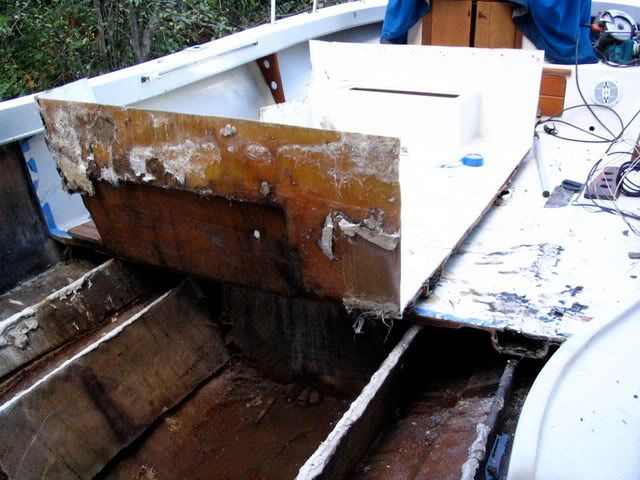
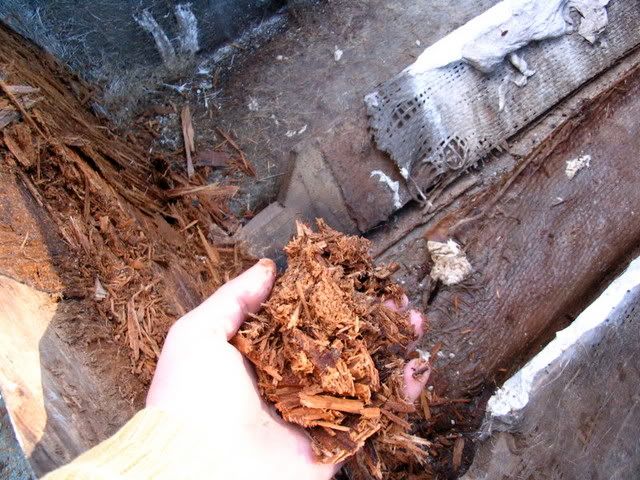
Its a 73 center console. I leveled the boat out. De-rigged and removed the console, rub rail, and unscrewed the cap. Lifted the cap, cut across the inner liner and separated the inner liner from the outer liner using a wonder bar. Pryed up on the flor and popped the inner liner up and out. The Transom is toast and I was able to remove most of it by hand, literally. Just got the epoxy resin and glass. Im gonna start laminating and will post more pics. After the transom then the stringers.
 
That has to be the worse transome I have seen yet!! :o Looks like you will be doing stringers and bulk heads also!!

Good Luck!!
 
Oh, plan to install inspection hatches in various places or make a drawing of ribs and runners in case you want to spray foam.
 
WOW, another hardcore transom guy here. ;D
Its a mess, but dont give up. Will look better once you get her cleaned up.
Question: in your first picture, look like you can slightly see the cap...???is the cap still on ?????
Word of advise, some may disagree. A top knotch fiberglass guy watched me as I redid my transom. Everything went well, but when I went to put the cap on, somehow the transom got twisted out of shape by 3/8" to a half inch. I personnally think I should have put in three seperate peices of wood instead of one piece of wood covering the whole transom. The fiberglass guy told me, the strenght isnt in the wood, but in the fiberglass...and fiberglass is stronger then steel.
So, maybe if I would have pieced in the transom, it wouldnt have become slightly twisted. Actually, thats how wellcraft did my transom. Using three pieces of wood and not just one.
Either way post alot of step pictures or the rebuild. ;)
 
Yes, transom, stringers, bulkheads, the whole shebang. Actually the srtingers are not rotten, just delaminated, so I will re-tab those in and add some knees in the transom area. Replace the bulkheads. The floor core is good as well. The rest of the hull is asthetically in great shape and that is why Im bothering to fix it.

I was careful levelling out the hull and have been taking measurements to aviod distortion. I popped the cap up to get out the liner I cut but then popped the cap back on and threw in some screws to keep the hull shape together. May be unnecessary.

As for the transom core Im undecided. I am going to get 1/2" ply and cut it to shape, 3 pieces. See how easy it takes a bend and go from there. If it looks like its putting too much pressure on the hull I will cut it into three sections and scarf them in. That is what was there originally.
 
I cleaned the surfaces with a grinder, and cut a template from cardboard. Ill post some pics, hopefully I can cut the ply and start laminating this weekend.

Does anyone know if its OK to use stainless deck screws, leaving them in the wood as I laminate? Im hoping to screw the plys together as I go but I do not want to worry about taking them out.
 
screws will rot and or corrode from the moister in the wood. Also so will allow moister to get in around the screw.
 
I removed some of my screws. Didnt want to install something, drill a hole and hit a screw. :-/
But also left a few in, counter sunk, glassed over on both sides. Shouldnt be a problem.....I hope.

Any more work on the transom...Pics. ???
 
I would think that as long as everything was glassed in well it shouldn't be a problem for at least 20+/- years. ???
 
Let me tell yah . . . The more rot the easier it is to remove!! Consider yourself lucky!!

you can get brass wood screws at ACE for under $20 a box or just use cheap drywall screws.

Leave the screws in there and laminate over the heads . . . as long as they don't stick out you're fine. That transom will last longer than the boat. If you want to be extra careful . . . you could remove them and fill the holes, but I don't think it's necessary. Screw and glue

Don't worry about getting the wood template perfectly to the edges. When you dry fit all the core . . . You can have 1/2" gap . . . just buy a big bag of Cabosil (aerosil) from composites one (10lb giant dog food bag is under $40 . . . and maybe some choped fibers) and mud the edges. Then you can laminate your skins . . . if you use multiple layers of ply wood (like 3 or 4 sheets) wet out both sides before you stick them together.
 
Thanks for the suggestions. I did get a few tubs of cabosil to bed the core. I will try to remove the screws as I go, I was only going to use them to help my three 1/2" sheets of ply make the transom curve, just didnt want the laminate to come apart if I remove them prematurely. If I left them in they will be covered by 4 layers of mat and 4 layers of biaxial glass (not in that order) and sealed in epoxy.
 
Back
Top