So Here She is

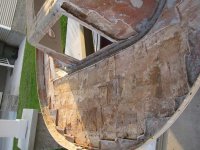
Ridge, when you reinstalled those outside bulkheads, how did you attach them?

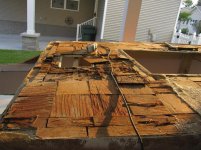
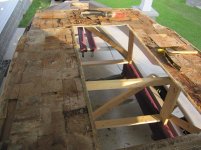
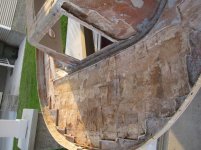
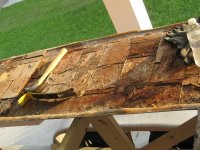
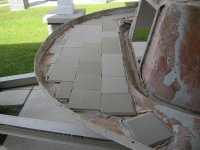
I've done 2 of the 10 by bedding them in PB with a nice filet and then applying 3 layers of 17 oz biax (epoxy) at 4", 6" and 10" widths. Reading more I see the guru's on other sites saying foam bedding of bulkheads. Beginning to second guess if I should do the others like that or carry on with what I am doing.

Anybody else have an opinion or advice? Keep in mind there are 5 of these down each side going from the top of the stringers to about 5" above the chime and over 2 strakes.

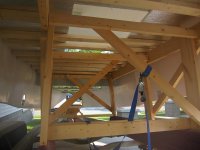
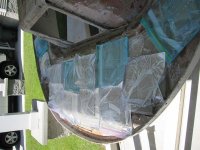
Also, when you replaced the cap, did you put a layer of putty over the grid as was done originally? If so what did you use? I'm thinking I may want to be able to remove this cap again one day.....in 30 years.

PB?
 
Time for an update and a few pics. I wish I had taken a few of the structural work prior to the flip but there will be time for that later. I've glassed in the stringers and the grid outside of the stringers leading to the chine. All the wood for the anchor storage, additional hull support near the bow and storage compartments and supports is cut and shaped for moving the batteries just forward of the console under the sole. The transom is about 85% fair, pretty smooth but will need a couple small areas touched up.

The hull is flipped at this point and the first coat of Interlux A2000 E is on. Now I will start with fairing the strakes and filling and rounding the knicks on the chines, then 4 more coats of 2000, sand with 80 grit followed by Interlux VC Perfomance. Above the waterline will be primekote followed with Mauritius blue.

Now the bad part. Seems I can't catch a break. What I thought was isolated soft spots in the sole turns out to be the entire thing. See pics. I've ordered 1/2" divynicell that will be here week after next. Now to build an additional platform for the sole to rest on that will not allow the unreinforced sole to warp. Yee-Haw
 

Attachments

  • Boat 16 website.jpg
    Boat 16 website.jpg
    70.8 KB · Views: 130
  • boat 17 website.jpg
    boat 17 website.jpg
    48.6 KB · Views: 129
  • boat 18 website.jpg
    boat 18 website.jpg
    90.6 KB · Views: 137
  • boat 19 website.jpg
    boat 19 website.jpg
    76.1 KB · Views: 138
Last edited:
Couple more pics. I put the cap on the trailer so that I could work on this back home so I can appease the ms. with a little face time. :fight:
 

Attachments

  • boat 20 website.jpg
    boat 20 website.jpg
    84.9 KB · Views: 118
  • boat 21 website.jpg
    boat 21 website.jpg
    44.7 KB · Views: 123
Absoulutely beautiful work!!!!! The PO on my boat had aborted the floor so bad with "home depot" resin and cloth on mine that I decided to tackle my sole core issue from the topside. Your kicking some @$$!!!!! gitt'er done!!!!:beer:
 
I "bedded" or "glued" my sole ply down with resin thicked with cabosil(no chop strand). I sanded my stringer surface and my bildge side surface of my ply were my stringers hit with like a 50 grit paper ( I was trying to create a rough tooth to the glass for better adhesion)). I then filled a gallon ziplock bag with my thickened resin and cut the corner out creating a "cake decorating" bag to apply my mixture. I do all my fillets with the ziplock also, its cleaner and easy to apply. I also was able to screw my sole down, Im sure your trying to keep factory skin on your floor as best as you can with no screw holes.
 
Thank you for the comments Kracker. I have been trying to come up with a solution to bed the stringers to the sole from underneath doing this rebuild in this way. My thoughts are that once complete, insert the cap in the hull, do a test fit, then lift, "decorate" the tops of stringers and place the cap back in, then fill some bags with water to place even weight over the sole.

My primary concern is being able to lift the cap off in the future for any further modifications. I'm going to see what I can find/mix that will stick, just not really bond. I'm thinking poly resin/cab mix with no sanding to avoid an unbreakable bond.

I am trying something kind of new with the replacement in a rather non-traditional way. I weighed the time involved and thought this may test my fiberglass skills a little less by not having to tie all the original hatch lips/livewell into my new floor. We shall see.
 
Time to post more pics. I've been rebuilding using divynicell H80 1/2" foam board. Lots of grinding to get all the rot and not quite rot off. Getting the platform to make the floor completely flat took a little more than I was anticipating but it is FLAT. Bags of water were to distribute weight across the foam board to get a nice bond between the original deck skin and the foam.

Two layers of 1708 will cover it all.
 

Attachments

  • boat 23 website.jpg
    boat 23 website.jpg
    97.4 KB · Views: 114
  • boat 24 website.jpg
    boat 24 website.jpg
    73 KB · Views: 113
  • boat 25 website.jpg
    boat 25 website.jpg
    48.6 KB · Views: 111
  • boat 26 website.jpg
    boat 26 website.jpg
    88 KB · Views: 116
  • boat 27 website.jpg
    boat 27 website.jpg
    72.4 KB · Views: 112
Here is a pic that shows the 1/2" thick aluminum plates to bolt the t-top to as well as a profile of the divynicell. Another pic is the foam board all pre-cut and ready to be removed to lay a layer of PB and place back on.
 

Attachments

  • boat 28 website.jpg
    boat 28 website.jpg
    65 KB · Views: 113
  • boat 29 website.jpg
    boat 29 website.jpg
    37.1 KB · Views: 110
  • boat 30 website.jpg
    boat 30 website.jpg
    76.5 KB · Views: 115
tarfulle were did you get your windshield? and what kind of cost did you encure? mine is split down the middle and sure would like to have a new one if cost was not to much. thanks
 
Updated Pics
266124d1347167661-81-wellcraft-cc-restoration-boat-31-website.jpg


266129d1347167855-81-wellcraft-cc-restoration-boat-34-website.jpg

266131d1347167855-81-wellcraft-cc-restoration-boat-36-website.jpg

266132d1347167855-81-wellcraft-cc-restoration-boat-37-website.jpg

246604_10151011513716116_1875656691_n.jpg

398484_10151011515916116_700488853_n.jpg

557759_10151011579751116_251731434_n.jpg
 
Pics above show 6 coats A2000 primer on hull bottom along with 4 coats of Primekote on the sides. I alternated between grey and white A2000 so I could see how many layers I was sanding through. Each coat of Primekote was block sanded with 220 grit.

I finished replacing almost all the wood in the cap with divynicell and decided to insulate my forward fishbox while I was at it. Built a mold, lined it with cellophane and filled with 2LB expanding foam. Then I shaped it to accommodate the stringers. What you don't see is that I painted it with white epoxy resin.

Then back to painting. Used Interlux Perfection and IT WAS A *****! I rolled and tipped 7 coats while handsanding with 320 grit between coats. Each time it was different problem. Ended up building a tent with a ventilation system and shooting it. Finally great finish. Put 3 coats of Performance VC on the bottom and now just a little hand sanding to get it glossy on the transom and at the bow and that phase of the project will be done.
 
How did I miss this?? Amazing work. Are you using polyester or epoxy resin? If you do not mind me asking, what does the divinycell cost?
Here is where I got my 1/2" H80 divynicell, think $128 for a 4 x 8 sheet. I went with this to save weight to make up for the extra resin I used. After bonding the H80 to the existing deck, I used 2 layers of 17 oz fabric and it is incredibly strong. Ended up using 3 sheets total for everything. I still need to recore the hatches with what I have left.
http://www.fiberglasssupply.com/Product_Catalog/Core_Materials/core_materials.html

I've been using epoxy resin.
 
Thanks. Not as bad as i thought. Do you think I can use Divinycell for walls and roof on a pilothouse? Also rebuiliding the cuddy from scratch.
 
Absolutely. I made a 8" x 8" test piece using the original 1/8" fiberglass deck on one side and 2 layers of 17 oz on the other. I put it on the edge of my concrete steps and stomped on it expecting it to crack and darn near broke my ankle.

When they ship it they will cut it down in 2' x 4' sheets and whether you buy one or three shetts shipping costs the same.
 
Back
Top