many questions about repairing/replacing stringers

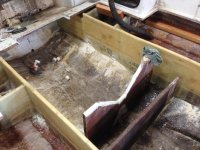
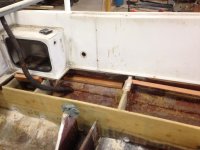
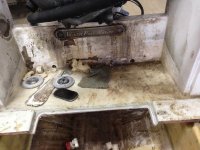
I wouldn't put in any foam. You have the right idea about letting everything drain well and get air to it to dry out. I think it's a good idea if you park her indoors to open the hatches to let air circulate, if not at least the ones inside the cuddy if you have a cuddy model. Interestingly mine didn't have any foam except for around the rotted out fuel tank.

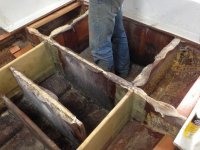
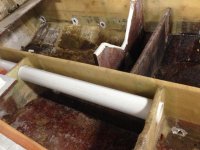
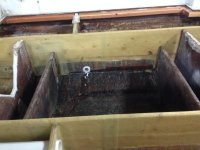
When reinstalling the deck you should add additional hatches where available. My cuddy had a huge void forward of the fish box that I opened up and installed my batteries and an additional bilge pump. Also you should add hinges to your fuel tank hatch to make it easier to inspect or remove if necessary.

Great hearing everyone's progress!
 
i also added a compartment forward of the fish box, not sure if it's doable on a center console


also agree with bradford on the air circulation, this is what i do when parking mine

 
Last edited:
you can do it on a Center console. I am going to do it on mine. There is a lot of storage down there. I am going to put in a false bottom. That way I have room to mount the trolling motors.
 
Man oh man, been where you are:
http://wellcraftv20.com/community/showthread.php?t=17379&highlight=81+wellcraft+center+console

All in all good advice you are getting. I would plan to tab in with more than 1 layer of tape. You will find that a layer of 1708 cured out is flexible, around 3 layers you get rid of most of the flex. Your peanut butter should have schopped strand in it as well. Straight resin and cabosil mixed is pretty brittle even though epoxy resin has more flex than polyester.

Make sure before you get started you have lots of acetone, rags, a box of those medical gloves (nitrile/latex) lots of measuring cups and stir sticks

You asked about original glass prep; I used a 4" grinder with 60 grit disks.Scuffed an area about 1' wide the entire length of the stringer, followed by vacuum then wipe down with alcohol. Alcohol evaporates much quicker than acetone. Acetone leaves behind a bit more residue so I wouldn't recommend it for prep work.

When putting in your fillets on your stringers, it works well to put your PB mix in a 1 gal. ziplock bag with the corner cut out to use like a cake decorating bag. Lay the bead and use the end of a spoon give you a nice uniform radius.

Do at least your first layer of tabbing when you do your fillets.

Do not try to do any fiberglass wet-out without a resin roller. I bought several but my favorite by far was my 2.5" length and 3/8 diameter roller, used it almost exclusively.

Also as far as 1708, I liked the 45/45 thread. As far as laying out the glass and wetting out, the direction of the stiching is everything. Stiching running parallel to the bend work much better than perpendicular.

Tartuffe, Do you know about how many hours it took you to put in the stringers and bulkheads?
 
I would say realistically around 60 hours cutting and shaping wood, bevels for the scab pieces, routing the tops of the stringers, and glassing in but thats not counting the 100 hours I stared at it. Measuring was the worst part and figuring out how everything was going to go together.


It was fun though once I started to view it as a hobby rather than a job.

thanks for the estimate. I figured there would be a lot of time involved. I am trying to gauge whether or not I will have enough time to have my boat floatable before june. That darn transom of mine ended up taking so much more time than what I anticipated and I am still not done with it. I might have to start working on my rig in the evenings also.

Thanks again.
 
One thing I forgot to add in my post and that is in regard to the structural integrity of what you are doing.

The fiberglass hull without stringers or cross members/bulkheads is very flexible. When you go over a wake or wave and smack one square on the backside and your teeth rattle your boat absorbed alot of force. The areas furthest from the internal structure flex the most while those at the substructure do not flex at all. While not always teeth rattling, this force and flex happens constantly.

Your goal is to gradually transition that flex to the inflexible point over as large a distance as possible. Multiple layers of tabbing starting 6" from the stringer, then 4", then 2", to your filet disperse the flex and prevent what are referred to as hard spots. Its very important.
 
Way over due for some updates and photos...but I have questions...so I'm back.

We have the new stringers in and couldn't be happier. We left the old bulkheads and although some are a bit damp the wood will not touch the new stringers...we are yet to tab them to one another.

Limber holes are drilled thru the stringers and we are using 3M 4200 to coat them. We've applied one coat and will apply a 2nd coat and bed in the gray PVC piping to hopefully get a tight fit. We had no 5200 handy and couldn't wait...so hopefully the 4200 is sufficient or our hard work may be in vein!

Question: What type of paint can be used to cover the bilge and paint a few areas of the hull interior? I'm assuming we can just wipe with acetone and some type of epoxy paint...but we are clueless so any specifics would be helpful. Just trying to pretty it up on a budget.

Question: I've also included a shot of the transom which (luckily) was the only thing on the boat that wasn't soft. As you look at the attached photo you'll see the gel coat is cracking and seperated from some parts of the inside of the transom. We are going to custom bend an aluminium plate to pretty up this area. Any suggestions if we should seal/fill that crack up gel coat here?
 

Attachments

  • IMG_5155.jpg
    IMG_5155.jpg
    77.6 KB · Views: 37
  • IMG_5157.jpg
    IMG_5157.jpg
    70.1 KB · Views: 31
  • IMG_5160.jpg
    IMG_5160.jpg
    53.6 KB · Views: 32
  • IMG_5162.jpg
    IMG_5162.jpg
    60.6 KB · Views: 33
  • IMG_5164.jpg
    IMG_5164.jpg
    70.9 KB · Views: 36
Dont prep painted areas with acetone, it leaves a residue. Bilge areas need a paint meant for standing water, if not it will blister and peel after a week of water in your bilge. I used interlux performance vc in my bilge, it works well. Rustoleum makes a topside paint, never used it but heard good things.

Are you going to put foam back in your boat? I would if I were you.

Regarding covering up cracked gel coat, need pics.
 
Are you going to put foam back in your boat? I would if I were you.

Regarding covering up cracked gel coat, need pics.

Thanks for your comments...what is your priority for the foam as I've seen several posts say they are not doing it?

If you look at the last photo and click on it in detail you'll see the gelcoat cracks on the dirty (inside) of the transom around the engine area. Suggestions?
 
My eyes are not so great that I can get an idea of why the gelcoat is coming off in chunks if I am seeing that correctly.

Regarding the foam, people will say it leads to rot, absorbs water.......If not built properly it, sure it could lead to rot. Question is do you want the boat to last 30 more years full of flotation or 100 years and you are one piece of debris in the water away from having your family in the water awaiting rescue?

If you put drains in your rod holders and consider how water gets under the deck, you can figure out how minimize water intrusion. My boat was 30 years old when I ripped it apart and the only place i found water saturated foam was under the fuel tank. It got there from the bulkheads rotting out.
 
We have stripped the decals off the boat and I don't think we have to sand it down due to the shine still in the hull. I'm hoping simply compounding, polishing and waxing will do. I've got a buddy who does vehicle wraps and will work with him on new graphics to cover up the old ones and the shine left by the stripes.

What do you use the prep the hull especially with the glues from the old decals. we used a special wheel to rip the decals off the hull but the glue and such remains.

I know it should be washed with a acid solution (delimer) but can I acetone the hull...it seems to want to talk that adhesive off that adhesive mover cannot budge. Or will acetone damage the gelcoat in some way?
 

Attachments

  • IMG_5202.jpg
    IMG_5202.jpg
    61.7 KB · Views: 23
  • IMG_5203.jpg
    IMG_5203.jpg
    63.3 KB · Views: 23
  • IMG_5204.jpg
    IMG_5204.jpg
    59.5 KB · Views: 23
  • IMG_5205.jpg
    IMG_5205.jpg
    37.4 KB · Views: 23
  • IMG_5206.jpg
    IMG_5206.jpg
    46.1 KB · Views: 18
Thanks Destroyer...I'm going to guess this is the same thing as the industrial d-limer I user her at work that is also a mild acid. It's amazing for cleaning the hull just like any over priced boat cleaner I've used (with acid) but it doesn't do much to those decal adhesives!
 
Well, you have three choices, you can use Oxalic acid or Muriatic acid (Muriatic acid is another name for hydrochloric acid) They are not delimers, although they might work for that use. Muriatic acid is used to etch concrete after all, so I'm sure it attacks lime. Or you can use Marykate. The three main ingredients in it are Muriatic acid, Oxalic acid and Phosphoric acid. Again, I cannot promise you that they will remove the adhesive residue, but I can speak from experience and tell you that it it has never failed to remove everything from my boats hull. rust stains, oil stains, scum, marine growth, creosote rub marks, you name it, it's removed it and it does it in a hurry. And of course you can also try Goo Gone (available in just about any home center store). or (no, I'm not making this up) Peanut butter. My wife uses it all the time to remove the sticky goo left on an item after she removes a sticker or label from something she's bought.... and damn if it doesn't work.
 
How do you feel about acetone on the gelcoat since it's doing the best? Any first hand knowledge or experience?

Tried goo gone, west marine adhesive remover as well as the industrial citrus cleaner we use for adhesives at work. Will consider the difference acid but just went out and tested the peanut butter...I think that's best left to price labels on the bottom of dishes!!
 
When I painted my outboard cowling I used 3m wood grain adhesive remover. It came in an aresol. Acetone will evaporate too fast. There's also a 3m general adhesive remover that should work. I hope that what's left is the glue and not staining from the eraser wheel. Sometimes they can heat up and burn the Gelcoat.
 
Thanks for the input...

The acetone works great...but I just don't know what damage it can do. By evap'ing to quick do you mean it's gone before it can do the work?

I'll have a look for the other products...

If you burn gel coat it's pretty obvious even to an untrained eye. This is clearly left over decal and glue.

Exactly. I work as an auto painter and what we normally use is enamel reducer. I was talking to a guy I work with and he recommended naptha. It's available at Home Depot and he said it's similar.
 
Back
Top