1978 v20 Center Console.

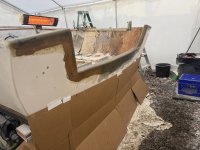
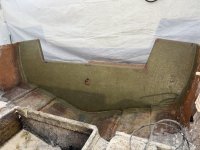
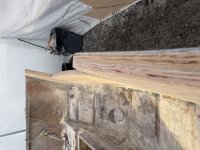
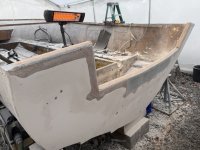
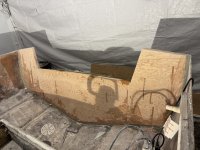
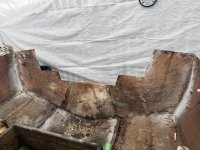
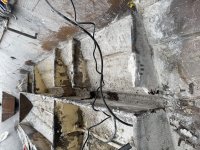
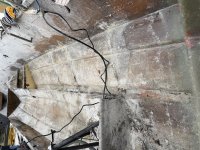
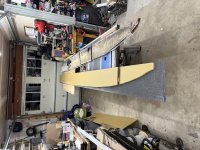
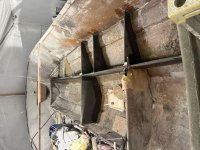
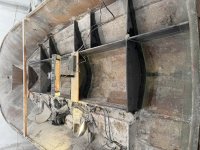
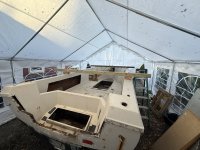
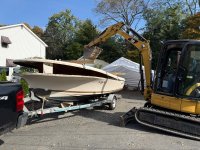
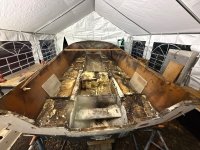
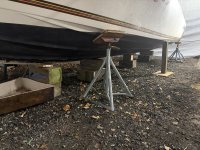
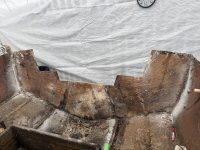
12 years since my last v20cc rebuild and had to get another one. Got a rotten transom, deck and stringers for $500. But had a new (2024)60 gal fuel tank and a trailer with new tires. Pulled the cap, replacing transom with marine plywood, coosa stringers and deck core. All vinylester resin laid. I’m attaching pic of pulling cap because it only took an hour once I supported everything. Really easy, wish I did this last time because doing transom from inside is the best in my opinion.
 

Attachments

  • IMG_1410.jpeg
    IMG_1410.jpeg
    3.4 MB · Views: 16
  • IMG_1420.jpeg
    IMG_1420.jpeg
    7.6 MB · Views: 16
  • IMG_1431.jpeg
    IMG_1431.jpeg
    2.5 MB · Views: 14
  • IMG_1432.jpeg
    IMG_1432.jpeg
    6.5 MB · Views: 15
Last edited:
PTSD flare up after seeing those pics. Square nose shovel works good to chunk out that foam. Nice job, demented minds think alike. That’s exactly how I went about my rebuild. I disliked how they cut the top of stringers for the rigging tube crossover. Put mine between stringers when it went back together. Wow, just wow! Keep the photos coming, there are others looking to do the same. Switch caps, etc..
 
Thanks for the input guys. Hope you all had a Merry Christmas. Got some transom work done this week. So far going pretty good. Used 3/4 marine ply. All vinylester It’s got 7-1708 , 5-1 1/2oz csm so far. Probably going to put a layer on outside skin later.
 

Attachments

  • IMG_2147.jpeg
    IMG_2147.jpeg
    4 MB · Views: 11
  • IMG_2146.jpeg
    IMG_2146.jpeg
    6.8 MB · Views: 11
  • IMG_2141.jpeg
    IMG_2141.jpeg
    4 MB · Views: 10
  • IMG_2142.jpeg
    IMG_2142.jpeg
    6.3 MB · Views: 10
  • IMG_2140.jpeg
    IMG_2140.jpeg
    3.5 MB · Views: 11
  • IMG_2116.jpeg
    IMG_2116.jpeg
    5.3 MB · Views: 10
  • IMG_1974.jpeg
    IMG_1974.jpeg
    8 MB · Views: 9
PTSD flare up after seeing those pics. Square nose shovel works good to chunk out that foam. Nice job, demented minds think alike. That’s exactly how I went about my rebuild. I disliked how they cut the top of stringers for the rigging tube crossover. Put mine between stringers when it went back together. Wow, just wow! Keep the photos coming, there are others looking to do the same. Switch caps, etc..
Yea. I wasn’t sure how to or where to lift from to pull cap. The gunnels were the only solid areas so figured it will keep the shape staying bolted to the gunnels while it’s off this way.
 
That is way ou5 of my ability to even try to do something like that. I’m looking at the boat that’s a mess and I have to say. It’s a beautiful boat. Those lines and the flare. Beautiful. I’m so happy that the boat wasn’t trashed or scrapped. You are giving it another life and when done ,she will better then new. And she will take care of you. Great job
 
I think I’m in agreement with you steplift20. I don’t have it in me anymore. Nice work indeed. I don’t have any pictures of my rebuild. Wish I did. I was instructed by a good glass guy to poke holes in the new coring. So I lay the core into a couple wet layers of CSM and weigh it down with something to help air escape. Resin rich.. not the lightest or strongest way to go but it did work. Don’t want to write a book but I had enormous waste in resin. Working in Florida in 100+ degree weather and the humidity made hardener ratios and time to work difficult to balance. That space heater will help you big time. As my project wore on and on I had to resort to that and the portable spot lamps . 👍
 
I think I’m in agreement with you steplift20. I don’t have it in me anymore. Nice work indeed. I don’t have any pictures of my rebuild. Wish I did. I was instructed by a good glass guy to poke holes in the new coring. So I lay the core into a couple wet layers of CSM and weigh it down with something to help air escape. Resin rich.. not the lightest or strongest way to go but it did work. Don’t want to write a book but I had enormous waste in resin. Working in Florida in 100+ degree weather and the humidity made hardener ratios and time to work difficult to balance. That space heater will help you big time. As my project wore on and on I had to resort to that and the portable spot lamps . 👍
Yep. Same here. Did relief cuts for the v20 angles, drilled holes in core sheets, put 1- csm & 1- 1708 between core sheets. Used screws, bolts and clamps to pull it together. The relief holes are great to confirm you got resin in all areas.
 
I think I’m in agreement with you steplift20. I don’t have it in me anymore. Nice work indeed. I don’t have any pictures of my rebuild. Wish I did. I was instructed by a good glass guy to poke holes in the new coring. So I lay the core into a couple wet layers of CSM and weigh it down with something to help air escape. Resin rich.. not the lightest or strongest way to go but it did work. Don’t want to write a book but I had enormous waste in resin. Working in Florida in 100+ degree weather and the humidity made hardener ratios and time to work difficult to balance. That space heater will help you big time. As my project wore on and on I had to resort to that and the portable spot lamps . 👍
Yep. Same here. Did relief cuts for the v20 angles, drilled holes in core sheets, put 1- csm & 1- 1708 between core sheets. And used Cabosil and chopped glass to fill edges and level the inner skin. Used screws, bolts and clamps to pull it together. The relief holes are great to confirm you got resin in all areas.
 
Got some free time last weekend to get back on it and start stringer and bulkheads. Just tabbed in until they are all in.
 

Attachments

  • IMG_2187.jpeg
    IMG_2187.jpeg
    7.8 MB · Views: 7
  • IMG_2188.jpeg
    IMG_2188.jpeg
    8.1 MB · Views: 7
  • IMG_2193.jpeg
    IMG_2193.jpeg
    5.7 MB · Views: 7
  • IMG_2201.jpeg
    IMG_2201.jpeg
    5.5 MB · Views: 6
  • IMG_2213.jpeg
    IMG_2213.jpeg
    7 MB · Views: 7
Back
Top