Transom repair

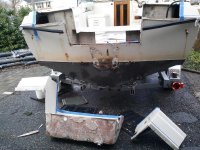
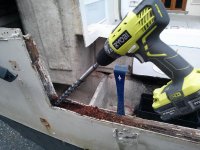
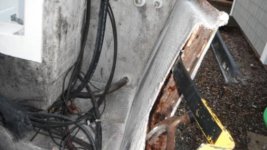
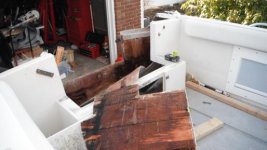
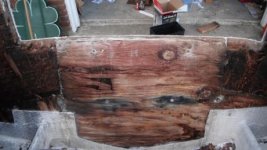
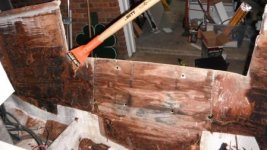
The snow is gone and the boat is in the driveway. Removed the swim platform, various screws, and loosened the rub-rail. Stared at it for a long time...

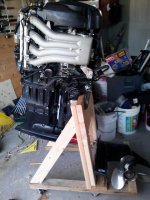
Need to borrow a motor jack & build a stand. See link
http://forums.iboats.com/forum/boat-repair-and-restoration/boat-restoration-building-and-hull-repair/272755-building-an-o-b-motor-stand-instructional

Went to Harbor Freight and bought a cheap chinese angle grinder & some wheels and a cheap chinese electric chain saw.

Drank a beer & stared at it some more...

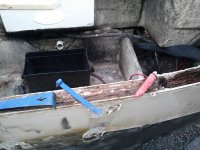
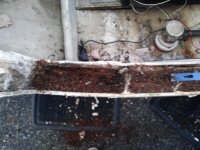
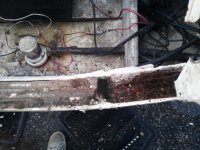
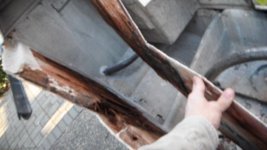
I looked into Arjay pourable... found it as Carbon-Core Ceramic pourable transom. Nearest place I can find to get it is ReinforcedPlastics of Farmingdale NY. $184/bucket & I need three. Long Island...100 miles....Gonna cost me $25 in tolls to get there..

So anyway, the thread is started, there's no going back. The GoPro will be recording the progress. Stay tuned.
 
cutting the cap at the stern, up to the opening of the hatch, then from the hatch opening down,across the splashwell and up the the hatch on the other side, then from the hatch opening down the stern.

Most of the cut is in the splashwell. Just 2 short straight lines in the transom cap.
By using the hatch openings, I'll have access to glass it back from the inside.
 
Got the motor off the boat & onto my newly constructed motor dolly.

Let the cuttin' & sandin' begin....
 

Attachments

  • Image 4-5-15 at 8.07 PM.jpg
    Image 4-5-15 at 8.07 PM.jpg
    45.4 KB · Views: 82
picture.php

cut lines in blue

picture.php


Cuts made in cap

picture.php


Cap is still stuck to transom inner skin. Trying to figure out a way to free it without cutting too much.
 
progress removing the splash well

So, after a couple days of cold rain, I got back to business...

After making my planned cuts, the skin of the motor well was still stuck to the transom inner skin. I started with a very thin pry bar and worked my way up, separating the skins which were cemented together. I worked slow & steady so as not to damage the skins.

After it popped loose, I had another problem.
I tried for about an hour to wiggle the entire piece out but could not do it.
I ended up cutting one corner of the piece off to get some wiggle room and she came right out.

I was surprised to see that the Transom is not one piece all the way across. There are three sections; 2 angle in from the sides and 1 straight piece in the center where the motor mounts. In the pictures you can clearly see the separation and there is even glass between the pieces.

The straight piece is in very good shape and I can say with 100% certainty that the motor was not in eminent danger of falling off. But the angled pieces were wet and black. I'll be removing the wood and inner skin, re-attaching the CLEAN skin to make a hollow space to pour the Carbon-Core.

I'm posting some pix just to wet your appetite but I am also shooting video and will post a youtube link when I finish.
 

Attachments

  • CAM00242.jpg
    CAM00242.jpg
    89 KB · Views: 116
  • CAM00245.jpg
    CAM00245.jpg
    71.9 KB · Views: 126
  • CAM00251.jpg
    CAM00251.jpg
    61.1 KB · Views: 108
  • CAM00250.jpg
    CAM00250.jpg
    74.1 KB · Views: 109
  • CAM00253.jpg
    CAM00253.jpg
    74.7 KB · Views: 110
I'll be glassing and painting inside the splash well.
I'm hoping to do the structural glassing from the inside, since I have access to the inside of the cuts through hatches.

For the very visible cuts in the stern of the cap, if I can get away with it, I'm going to try and just fill the outside line with Marine Tex. If so, I don't have to paint the entire cap.

I'm up in the air on this as well. I was hoping you were going to say gelcoat and you had a place to purchase it locally already tinted. I've messed around trying to tint gelcoat to match my Grady and its been a royal pain, and I do it all the time with cars.
 
inner skin is off

For anyone interested in how they built these transoms...

Yo can see the flat center where the motor goes is separated by glass from the angled sides. The sides are multiple pieces. You can see 4 vertical pieces (3/4" ply)on each side. They cover 2 horizontal 3/4" layers on each side.

It appears that they built the hull with a full transom and then cut the notch for the motor. Its a shame they didn't glass over the cuts. You just gotta wonder what bean counter decided that was a good idea.
 

Attachments

  • DSCF1548.jpg
    DSCF1548.jpg
    24.6 KB · Views: 95
  • DSCF1549.jpg
    DSCF1549.jpg
    24 KB · Views: 95
  • DSCF1552.jpg
    DSCF1552.jpg
    24.4 KB · Views: 90
  • DSCF1557.jpg
    DSCF1557.jpg
    23.1 KB · Views: 88
  • DSCF1564.jpg
    DSCF1564.jpg
    24.8 KB · Views: 88
Last edited:
For anyone interested in how they built these transoms...

Yo can see the flat center where the motor goes is separated by glass from the angled sides. The sides are multiple pieces. You can see 4 vertical pieces (3/4" ply)on each side. They cover 2 horizontal 3/4" layers on each side.

It appears that they built the hull with a full transom and then cut the notch for the motor. Its a shame they didn't glass over the cuts. You just gotta wonder what bean counter decided that was a good idea.

Same thing on my Grady. I guess it was just par for the course back then.
 
The first picture (above the bloody finger picture) looks like a lot of the structural integrity of the splash well and top cap has been cut away.

I saw where you had a plan to repair it:
"I'm hoping to do the structural glassing from the inside, since I have access to the inside of the cuts through hatches."

I'm repairing the transom of my latest project, a Glastron HPV-175, from the inside. I've removed the gas tank and rotten wood and am basically laying on the floor of the boat working with outstretched arms and in cramped quarters.

Good luck on working thru the hatches on yours.
 
Back
Top