So this is how it is...

chesapeake724

Junior Member
...take on one project and five more spring up. ;)

My instrument panel re-do has turned into...

Complete Re-wire
Got the deck panel and starboard rodbox out, so might as well rewire the friggin' thing. There's a spaghetti trail of half abandoned and half in-service wiring that needs cleaning up. Anyone know: are the controls, including ignition & trim, all powered through the main wires connecting the control box to the engine? ('85 Johnson 175) Or, does it need power from the bus bar/fuse block circuit?

House Battery Install
I'm adding a second battery with a battery combiner to power everything but the engine.

Add Navman Fuel meter
Instead of putting the Fuel gauge back in, I'm doing the fuel flow meter instead. For a C-note more than the cost of a fuel gauge, I might as well go with the more accurate technology. I can always pop an inspection hatch and look at the gauge on the tank. Is the tank gauge mechnical or does it need power?

'Fix' deck panel
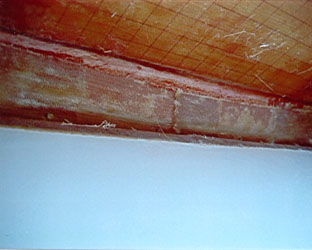
I took it (the big panel above the fuel tank) out and it's in front of a fan in my basement in the equipment room where the oil furnace and laundry stuff is. I figured this was a good environment to try and dry it out. It's wet w/ a good bit of rot. Piss-poor sealing job on the inspection hatches is to blame. There's a little delamination, but the skin is still good. I'm thinking of cutting a 'grid' of 6"x6" cuts with the circular saw, approximating the thickness of the core, and seeing if penetrating epoxy strengthens the panel enough to buy a couple years. I'll replace it altogether as needed. That might be right away, we'll see, but since the skin is intact, I think one attempt to save it with a minimum of work and $ is warranted.

Gotta' try and finish all this before the deep freeze sets in...
 
You always have to re wire all!! I have done this 3 times now and never did I get away with just fixing a couple of wires!!

2nd battery great!!

On my Johnson, mercury, and now the Yamaha the power comes from the main harness, which has wires to go to the battery.
Fuse bus is for eveything else!

I do not have a gas panel as my tanks are bove deck. But I am getting to like Starboard!! after you tear all the rotted wood out from the skin why not install Starboard in place of the wood?? They sell it 1/4. 3/8, 1/2, 3/4 thickness. You will never ever have to deal with it ever again after that!!

Good Luck
 
Use a wood chisel to remove all the plywood blocks, cut a pc. of marine grade plywood (5/8") and glass all sides and edges to the existing glass. It will be stronger than the original cover. I've done two of these and it's not bad at all.
 
Good work Cheakepeake!! You'll really appreciate the Navman and the new wiring/extra battery. You're doing this the right way. Those old electric fuel senders aren't very accurate and you never know exactly how much fuel you have left. Also the Navman will pay for itself, b/c you'll find the most efficent RPM range to operate in . . . instead of guessing.


Here's a little information that might help when redoing your hatch.

Mj recommend starboard which is a great material by itself . . . but HDPE/starboard won't bond well with polyester or epoxy, so it NOT good as a core material for fiberglass layups (i.e. the fuel hatch will delaminate as soon as you step on it).

If you are replacing the core and plan on reusing the old fuel hatch skin, Nida Core or Marine ply sections pieces are the way to go.

The problem with using one large piece of core material like one sheet of marine ply is that it's almost impossible not to trap air bubbles under the section (even if you use 500lbs of weight). Air Pockets will eventually lead to delamination (it's also possible to break through the skin if you apply localized pressure on the trap air pocket). If you use marine ply cut the core up into smaller pieces and glue them down to the hatch skin using epoxy and cabosil. Then use cabosil to fill in cracks. Then put on a few layers of glass.

If you chose Nida-core it has open honeycomb shaped cells and a veil on the top. With this type of material you can really squish the core down into the resin without trapping air pockets. the skin will be evenly supported and the core will make a strong uniform bond across the entire core.

After the core is in place you lay the final 3 layers of glass over the top and you'll have a super strong hatch that'll last forever.


If the whole hatch isn't rotted then you might be able to get away with only replacing small sections.

Before you jump into this project . . . you might want to read up a little. Your local library might have the following books.

------------------------------------------------------------------------

Elements of boat strength: Dave Gerr
chapters: 2, 3, 6
- Fiberglass construction materials and methods
- Fiberglass design considerations, Modern Laminates.
- FIberglass sandwich or cored construction

Fiberglass Boat Repair Manual: Allan H. Vaitses
- Chapters 1,3,4,5
- Material and Construction
- Art of fiberglassing
- Fractures, holes, delamination
- Dealing with core problems

Fiberglass Boat Building For Amateurs: Ken Hankinson

-------------------------------------------------------------------------

It's not nesscessary to read everything, but you'll get a much better understanding of the proper way to make a super strong laminate.
 
Sorry MJ -

I didn't mean to step on yah . . .
I actually tried it once with terrible results, after a little searching around I learned the hard way that it was a "no no" to use HDPE or starboard as a core material.

It makes sense now that I look back on the situation.  Nothing stains starboard . . . doesn't absorb any liquid.  It's very heavy dense plastic.   Because it's so dense the resin has nothing to bond to.  Even if you skuff up starboard with 80 grit paper the resins still can't penetrate the surface.  

With wood the resins can penetrate into the wood like roots.  The more deep roots you have into the core - the more difficult it will be to rip the skin off the core material.   Those skins and the thickness of the core are what give the laminate it's stiffness and strength.  

Here's a pic of the underside of the seacraft deck . . . you can see how they used the plywood pieces as a core material in the layup of the deck.  

P1010147_001.sized.jpg


Here's a contender's (balsa core? - I think)

Contend-6.JPG
 
Everythin Bigshrimpin says ... plus

Starboard is not a structural material ( I know the hatch ain't structural).

Starboard expands and contracts a lot with changes in temperature.

Just a couple of things to keep in mind. Starboard is great stuff ... just don't get carried away with trying to use it for everything. Don't want to see any starboard stringers or transoms. :o
 
No personal experience, but I've heard the same thing: starboard is very hard to stick to. Even wonder-adhesives like 5200 have a hard time holding it.

I'm mostly through Vaitses book. I highly recommend it, also. Not sure what I'm going to do. The skin is decent, but not so pristine that I should put a lot of time/money/effort into replacing the core. But replacing the whole deck will be further down the road, so I still want to take a shot at fixing this panel. If I fabricated (or had someone else do it) a new panel, it won't look right, right now against the old cockpit, and several years down the road, it won't be the same 'age' as the deck when that gets replaced.

If I cut and chisel the panel core, then I have the air bubble concern that BS mentioned. I was thinking, what if I layed down a skin of seacast (pourable coring material, usually for transoms) to give me a better 'face' for the new core to stick to? Is that price prohibitive, structurally/chemically unsound? I'll have to check SeaCast's site.

My other MacGuyver idea was to cut 'channels' out of the core, running crossways every 12" or so. Seal it up w/ epoxy, and then mechanically fasten 3/4 x 3/4 aluminum angle to act as structural ribbing. The edges of the panel are still strong, so the middle of the span is what needs help. This would be a cheap and quick way to still use the panel. I think it would restore enough strength that someone's foot isn't going to go through the semi-rotten core and land on the gas tank. Anyway, that's my think-outside-the-box side coming through.

Thanks for all the advice, gents. It's pretty mild out today, so the rewiring job beckons...
 
I was just suggesting, I am far from noing it all!! I am just starting to use all this different stuff. And BS is almost ready to build a boat froim strach!

So pay no attention to me!! I am just ther crazy guy on the board!! :-*
 
Keep it comin', MJ. You're good peeps in my book. I learned all I need to know when I saw you asked the iboats forum on my behalf about a vintage/model Yammy that I inquired about here. It may have been just a handful of clicks and keystrokes, but to take it upon yourself to do research for someone else speaks about your character. 8)

I don't know everything, either. You'll see that as my post count snowballs. ;D
 
Chesapeake - I don't know the extent of the damage in your floor, but if it's only a small area that's soft . . . you won't need to rip up the entire floor. You can remove the top skin on the area remove dig out the rot and glass the skin back down (make sure to bevel the edges and use fiberglass tape )


Here are some pics from another string off the classicseacraft site.

http://forum.classicseacraft.com/sh...r=21955&page=1&view=collapsed&sb=5&o=&fpart=1

wet-cast.jpg


casting.jpg


---------------------------------------------------------------------

For the hatch core -

Notice how the edges of the core are beveled and there is an area where the top and the bottom skin will meet and glue together. That's the right way to make a strong hatch. As far as what material to use . . . I think blocks of 1/2" marine ply would work great.

It's just when you use one piece . . . unless you drill lots of holes in it every 6 inches you're likely to trap a big air pocket underneath the core and that air pocket prevents you from making a bond to the core (also the more pressure you apply to the core the wider the airpocket spreads underneath the core)

DSCN3106.jpg


DSCN3011.jpg
 
One other thing - Vaitses doesn't seem to be a huge fan of epoxy . . . He loves vinylester and polyester resins. Based on my own personal experience using all three, I've found epoxy to be the most user friendly resin.

System III (2:1) epoxy the easiest to work with.

Followed by US Composites 635 thin resin.

www.uscomposites.com

I don't really like west systems b/c it's very expensive and cures quickly even with the slow hardener.
 
Back
Top