Should My Transom Have an Arc

tartuffe

Junior Member
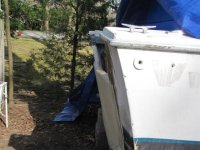
I am rebuilding my transom on my 81 V20 center console. The existing rotted transom was in 3 pieces cut at an angle and it looks like this was done in order to bow the transom out about 3" from straight.

Was the transom originally flat or 3" of bow? My guess is that it was flat and 31 years of motor pressure bowed it out and at some point a patch job was done.

Any insight is appreciated
 
First off let me be the first to say WELCOME

I'm thinking the transom IS supposed to be curved... If nobody confirms I can check mine to be sure but I 'spect one of the experts will be along soon enough.
 
Hey thanks for the welcome.

Regarding the transom being bowed, I was afraid that was going to be the answer. I could not figure out why those boards would be cut at an angle. This just added a good amount of brainpower (and I'm already at max power) in figuring how to proceed with doing this properly given my set ot tools and carpentry skills.
 
I used 2 pieces of 3/4 ply. The first piece of 3/4 ply I cut 4 relief cuts in it,I went about a third of the way through just to give enough relief to easily make the contour of the factory arch transom. If you use 3/4 ply the first piece you glue and clamp to outside skin will want to pull to the skin to the ply but with minute relief you will pull the ply to the skin. The second layer of 3/4 ply is cinch you don't have to relief cut this piece because structualy integrity of the transom is already establish with the first piece of ply. Or you could use 3 pieces of 1/2
 
Yeah, I've been reading through your thread Smoke linked above. You've done some really nice work. So you didnt go all the way through on the first layer. Good to know, I thought you had 4 separate pieces on that first layer of 3/4 ply.

I saw where you had a solid piece on the second layer of 3/4. While here, what did you use to adhere the two layers of ply together? Also how did you get both layers of ply so level with one another? They look really good. I was thinking a belt sander after you laminated the ply but before your first layer of 1708.

I glued my plywood layers with thickend resin using a mixture of cabosil as your thickener. Make to peanut butter consistentsy. I troweled it on with 1/4 inch knotch trowel like the one you use for ceramic tile. I hotcoated my ply before glueing. I'm new at this stuff also I did a lot of research before starting. The guys on this forum are AWESOME!!! No question is a dumb one,ask all you can because that's how you learn. Don't feel like you have pull the sheets of ply together super tight, just kinda massage your clamps or allthread still it starts ozzing out. I also tapped on transom with a rubber mallet so it kinda seats the glue evenly with vibration. Let me know if ya need more pics because I have a lot that I did not post that might help you out
 
I glued my plywood layers with thickend resin using a mixture of cabosil as your thickener. Make to peanut butter consistentsy. I troweled it on with 1/4 inch knotch trowel like the one you use for ceramic tile. I hotcoated my ply before glueing. I'm new at this stuff also I did a lot of research before starting. The guys on this forum are AWESOME!!! No question is a dumb one,ask all you can because that's how you learn. Don't feel like you have pull the sheets of ply together super tight, just kinda massage your clamps or allthread still it starts ozzing out. I also tapped on transom with a rubber mallet so it kinda seats the glue evenly with vibration. Let me know if ya need more pics because I have a lot that I did not post that might help you out


Thank you for your feedback. I feel pretty good with taking my next few steps when this crappy weather blows out.
 
Not far South from you in Greenville NC. Got a lot done yesterday but today was a total loss. I want to be out there more than my body wants another day of deconstruction so I can't complain too much.

Been a good day of online shopping. Found tyvek-like suits for about $1.50/ea. Looking forward to that half face respirator and googles showing up too.
 
When get the old wood out and transom prepped make you a cardboard board pattern of your transom. You will use it to cut plywood and glass patterns also.
 
I just got the first layer of 3/4" ply in last night. All in all pretty smooth process.

I can say poured transom but I can't tell the boss to swallow another $500 pill in addition to the $2000 pill I already got her to swallow for all the cool bling I've been acquiring for my "classic."

I'm lucky if I can get her to take her 1 pill a day.
 
Here is the new transom put in matching the old shape, my boat is a 75'
 

Attachments

  • IMG_0041.JPG
    IMG_0041.JPG
    55.9 KB · Views: 22
Here is the new transom put in matching the old shape, my boat is a 75'


Not bad, it took some serious torque to get that bend. I took the cap off the boat and am replacing mine from the inside. Just tabbed it in tonight.
 
Back
Top